Ever looked at a perfectly smooth wall and wondered how they got it like that? Plastering can seem a bit mysterious, but it’s actually something many people tackle themselves. We’ve gathered some common plastering FAQs, answered by folks who know their stuff, to help you out. Whether you’re a complete beginner or just need a refresher, this should clear things up.
Key Takeaways
- Different plaster types exist, like lime, gypsum, and cement, each suited for specific jobs and environments.
- Mixing plaster correctly involves precise measurements and thorough blending to get a smooth, lump-free consistency.
- Essential tools for plastering include trowels, buckets, and mixers, with quality tools helping achieve a better finish.
- Surface preparation is key; cleaning walls, fixing imperfections, and sometimes priming are vital steps before you even start plastering.
- Allowing plaster to dry properly between coats is important to avoid issues like cracking and poor adhesion.
Understanding Plastering FAQs
Right then, let’s get stuck into some of the most common questions people have about plastering. It’s a skill that can make a massive difference to how your home looks and feels, but there are definitely a few things to get your head around before you start slinging mud, so to speak.
What Are The Different Types Of Plaster?
So, you’ve decided to plaster, but which kind do you actually use? It’s not a one-size-fits-all situation, you see. The main types you’ll come across are:
- Bonding Plaster: This is your go-to for tricky surfaces like bare brick or concrete. It’s designed to stick really well to these kinds of backgrounds, giving you a solid base to work on. Think of it as the super-glue of the plaster world for rough surfaces.
- Hardwall Plaster: This is a bit of a workhorse. It’s often used as a base coat, especially on plasterboard, and it dries a bit quicker than some others. It’s also good for applying in thicker coats if you need to level out a wall.
- Multi-finish Plaster: This is a really versatile option. You can use it as a bonding coat on some surfaces, or as a finishing coat to get that super smooth look. It’s a good all-rounder if you’re not sure what you need.
- Finish Plaster (or Top Coat): This is the final layer you put on. Its job is to give you that really smooth, clean surface that’s ready for painting or decorating. You don’t want to be slapping this on thick; it’s all about that fine finish.
Choosing the right one really depends on what you’re plastering over and what kind of finish you’re aiming for. Get it wrong, and you might end up with bits falling off or a surface that’s a nightmare to paint.
How Do I Mix Plaster Correctly?
Getting the mix right is absolutely key. Too wet and it’ll be sloppy and won’t stick; too dry and it’ll be crumbly and hard to work with. The perfect consistency is like thick, smooth yoghurt.
Here’s the general idea:
- Get your clean water ready: Use a clean bucket and fresh water. The amount you need will be on the plaster bag, but always start with a bit less than you think you’ll need.
- Add the plaster powder: Gradually add the plaster powder to the water. Don’t dump it all in at once, or you’ll get lumps.
- Mix it up: Use a clean mixing paddle on a drill (if you have one) or a sturdy trowel. Mix it thoroughly until it’s smooth and lump-free. You’re looking for a consistency that holds its shape on your trowel without dripping off.
- Don’t overmix: Once it’s mixed, try not to keep mixing it for ages. Plaster starts to set, and overmixing can make it go off too quickly.
It’s always best to mix only as much as you can use within about 15-20 minutes, as it starts to harden in the bucket.
What Tools Are Essential For Plastering?
You don’t need a shed full of fancy gear to get started, but there are a few bits and bobs that are pretty much non-negotiable:
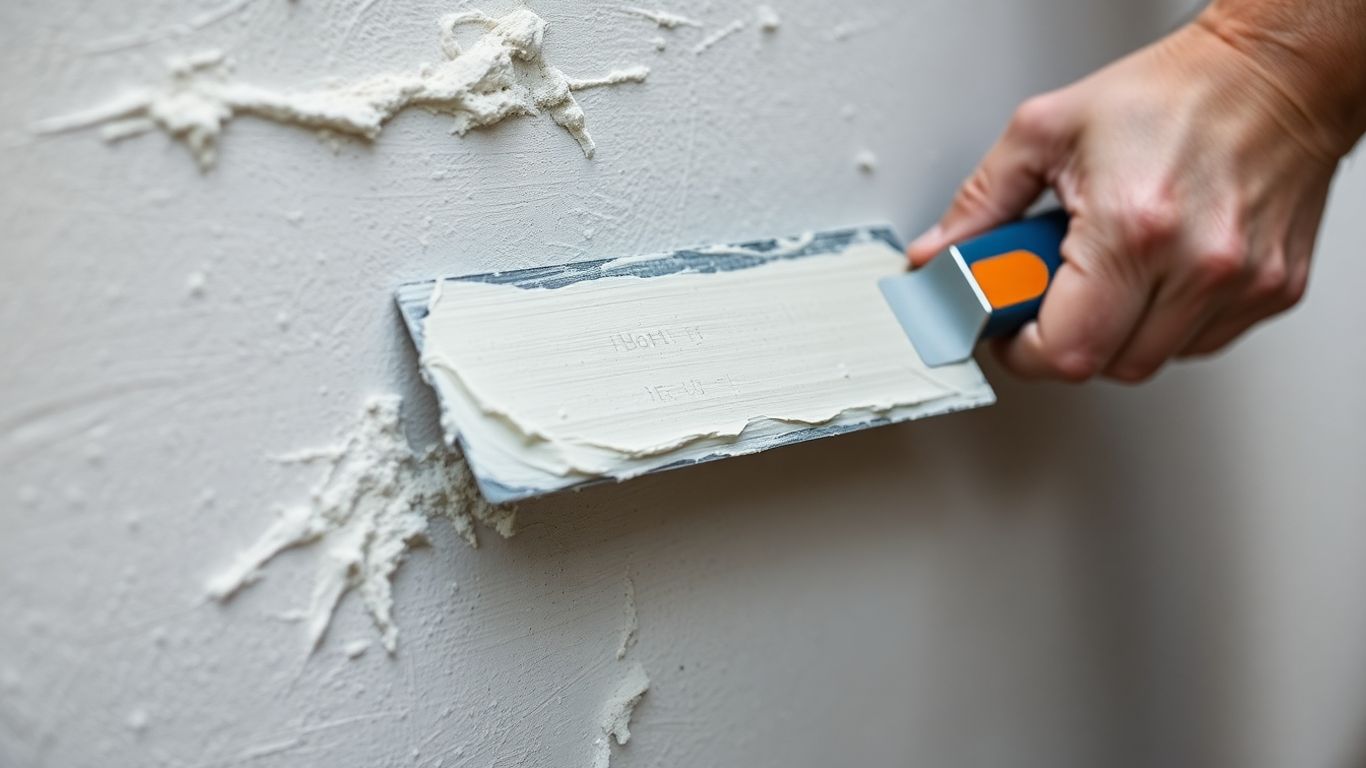
- Trowels: You’ll want a couple. A larger one for spreading the plaster and a smaller one for getting into corners or doing fiddly bits. A steel finishing trowel is great for getting that smooth finish.
- Hawk: This is a flat board with a handle underneath. You scoop plaster onto it, and then use your trowel to pick up plaster from the hawk and apply it to the wall. It saves your back and makes applying plaster much easier.
- Straight Edge (or Rule): This is a long, flat piece of metal or wood. You use it to level off the plaster, scraping off the excess and leaving a flat surface. A good length is usually around 1.5 to 2 metres.
- Bucket Trowel: A smaller, stiffer trowel that’s good for scooping plaster out of the bucket and onto your hawk.
- Mixing Paddle: If you’re using a drill, a mixing paddle attachment is a lifesaver for getting a smooth, lump-free mix.
- Spirit Level: To make sure your straight edge is actually straight and your finished surface is level!
Having these basics will make the whole process a lot less of a struggle and help you get a much better result. You can always add more specialised tools later if you get really into it.
Preparing Surfaces For Plastering FAQs
Right then, before you even think about slinging plaster around, you’ve got to get the walls ready. It might sound like a faff, but honestly, it makes all the difference. Get this bit wrong, and you’ll be kicking yourself later when things don’t stick properly or you end up with a lumpy mess.
How Should I Clean Walls Before Plastering?
First things first, you need a clean slate. Think of it like prepping a canvas before you paint – you wouldn’t just slap paint on a dusty surface, would you? You need to get rid of all the gunk. This means dusting off any loose bits, cobwebs, and general grime. If you’ve got any old, flaky paint or bits of previous plaster that are coming away, give them a good scrape off. You want a solid surface for the new plaster to grab onto. A stiff brush and a damp cloth usually do the trick for most walls. Just make sure it’s properly dry before you move on.
When Should I Prime A Surface For Plaster?
Priming is your best mate here, honestly. It’s not just about making the surface look a bit nicer; it’s about helping the plaster stick properly. Think of it like a sticky base layer. It stops the wall from sucking all the water out of the plaster too quickly, which can lead to cracks. It also helps to even out the suction across the wall, so you don’t get patches that dry faster than others. You can get specific plaster primers, or sometimes a good quality PVA solution, diluted correctly, will do the job. Always check the plaster manufacturer’s advice on this, as some plasters might not need it, or might need a specific type. It’s especially important on really porous surfaces or if you’re plastering over something a bit odd.
How To Fix Imperfections Before Plastering?
Got any holes, cracks, or dents? Now’s the time to sort them out. Little cracks can often be filled with a bit of filler, smoothed over, and then sanded down once dry. For bigger holes, you might need a patching compound. The goal is to get the wall as flat and even as possible. You don’t need it to be perfect, but you want to avoid any major dips or bumps. If you don’t fix these bits, the plaster will just sit on top, and you’ll see all the imperfections showing through, or worse, it might crack later on. It’s all about building a good foundation, just like with any building project.
Don’t rush this prep stage. It might seem boring, but taking your time now will save you a heap of trouble and make the actual plastering job so much easier and the final result look loads better.
Plastering Techniques FAQs
Right then, let’s get down to the nitty-gritty of actually getting plaster onto your walls. It’s not just about slapping it on, you know. There’s a bit of a knack to it, and getting these techniques right makes all the difference between a job that looks a bit iffy and one that’s proper professional.
How To Apply The Base Coat Of Plaster?
So, you’ve got your surface prepped, and now it’s time for the first layer, often called the ‘scratch coat’ or ‘base coat’. This is the foundation, and it needs to be solid. You’re aiming for a consistent thickness here, not too thick, not too thin. Think of it like laying the groundwork for a house – it’s got to be right.
- Get the mix spot on: Too wet and it’ll run off, too dry and it’ll be crumbly. You want a workable, stiff consistency.
- Apply with purpose: Use your trowel to spread it evenly across the surface. Don’t be shy, but don’t go overboard either. You’re looking to cover the wall, filling in any minor dips.
- Scratch it up: Once it’s on, and while it’s still wet, give it a good scratch with a scratching tool or even the edge of your trowel. This creates a rough surface that the next coat can really grip onto. This key step is vital for adhesion.
What Are The Best Smoothing Techniques?
Once your base coat has had a bit of time to firm up (but not fully dry!), it’s time for the next layer, and then the smoothing. This is where you start to get that lovely, flat finish. It takes a bit of practice, but here are a few pointers:
- Float it: Use a plastering float. It’s basically a flat board with a handle. You move this over the plaster in circular or sweeping motions to level out any high spots and fill in the low ones. It’s all about getting it even.
- Trowel time: After floating, you might use a steel trowel. This is for getting a really smooth finish. Hold it at a slight angle and use light pressure. You’re basically shaving off any tiny imperfections left by the float.
- Feathering edges: When you’re working on a large area, you’ll need to join up sections. The trick is to ‘feather’ the edges – meaning you thin out the plaster at the edge so it blends smoothly into the existing surface. This avoids any obvious lines.
How Long Does Plaster Take To Dry?
This is the million-dollar question, isn’t it? And the honest answer is… it depends. There are a few things that play a part:
- Thickness: The thicker the plaster, the longer it’ll take.
- Temperature and Humidity: Warm, dry conditions are your best friend. Cold, damp weather will slow things right down.
- Type of Plaster: Some plasters are designed to dry faster than others.
Generally, you’re looking at anything from 24 hours to several days for a base coat to be ready for the next layer. The final skim coat might feel dry to the touch much sooner, but it still needs time to cure properly before you think about painting. Don’t rush it! Painting or decorating too soon is a classic mistake that can lead to all sorts of problems down the line, like cracking or peeling. A good rule of thumb is to wait until the plaster has turned a uniform pale colour and feels cool, not cold, to the touch. If you’re unsure, it’s always better to wait a bit longer. For more on specific plastering services, you might want to check out Scott Moore Plastering.
Patience is a virtue when plastering. Trying to speed up the drying process by using heaters or fans too aggressively can actually cause the plaster to dry too quickly on the surface, leading to cracks while the deeper layers are still wet. It’s a balancing act.
Expert Plastering Tips FAQs
Right then, let’s get down to some proper advice for plastering. It’s not rocket science, but a few pointers can make a world of difference between a job that looks okay and one that looks absolutely spot on.
What Are The Top Tips For Plastering?
- Get your prep spot on. Seriously, this is half the battle. Make sure the wall is clean, dry, and free from any loose bits. If it’s a bit dodgy, a quick skim or even a bit of PVA can sort it out. You want a good surface for the plaster to grab onto.
- Don’t try to do too much at once. Work in manageable sections. Trying to plaster a whole wall in one go when you’re still learning is a recipe for disaster. You’ll end up rushing and making a mess.
- Keep your tools clean. This sounds obvious, but dried plaster on your trowel or float will just make your life harder and leave marks. Give them a good rinse after each use.
- Practice makes perfect. If you’ve got a spare bit of board or an out-of-the-way corner, have a go at practicing your techniques. Getting a feel for the plaster is key.
What Mixing Advice Do Experts Give?
Mixing plaster is more art than science, but there are definitely some rules.
- Start with water, then add plaster. This helps you avoid lumps. Pour the amount of water you think you’ll need into your clean bucket, then gradually add the plaster mix, stirring as you go.
- Aim for a smooth, creamy consistency. It shouldn’t be too wet and runny, or too stiff and crumbly. Think thick yoghurt or double cream. If it’s too stiff, add a tiny bit more water; if it’s too wet, add a bit more plaster.
- Mix only what you can use. Plaster starts to set pretty quickly, especially in warm weather. It’s better to mix a smaller batch and get it on the wall than to mix a huge amount that goes off in the bucket.
Here’s a quick guide to consistency:
| Consistency | Description |
|---|---|
| Stiff | Like thick dough, hard to spread |
| Creamy | Smooth, easy to spread, holds its shape |
| Runny | Like thin soup, drips everywhere |
What Application Insights Are There?
Getting the plaster onto the wall smoothly is where the magic happens. It takes a bit of practice, but these tips should help:
- Use your hawk and trowel. Load up your hawk with a good dollop of plaster, then use your trowel to scoop it onto the wall. Don’t overload the trowel; a few good scoops are better than one massive one.
- Apply with even pressure. When you’re spreading the plaster, try to keep the pressure consistent. This helps you get a more even layer. Work from the bottom up, and don’t be afraid to go over areas a couple of times to smooth things out.
- Feather the edges. When you’re finishing off a section or joining up to an existing bit of plaster, make sure you feather the edges really thin. This makes it easier to blend in the next section and avoids thick, obvious lines.
Don’t be disheartened if your first few attempts aren’t perfect. Plastering is a skill that improves with practice. Focus on getting a consistent thickness and a reasonably smooth finish, and you’ll get there. It’s all about patience and a steady hand. For more on keeping your plaster looking good long-term, check out prevent plaster wall damage.
Avoiding Common Plastering Mistakes FAQs
Right then, let’s talk about the bits that can go a bit pear-shaped when you’re plastering. It’s not rocket science, but there are definitely a few pitfalls that can turn your smooth wall dreams into a lumpy nightmare. Getting these sorted means you’ll end up with a finish you’re actually proud of, rather than something you want to cover up with a giant poster.
How To Prevent Poor Surface Adhesion?
This is a biggie. If your plaster doesn’t stick properly, the whole lot can end up peeling off down the line. It’s usually down to not prepping the wall right.
- Give it a good clean: Make sure there’s no dust, grease, or old flaky paint hanging about. A damp cloth usually does the trick, but for really grubby walls, you might need a bit more elbow grease.
- Sort out any damage: Fill in any cracks or holes. If you plaster over them, they’ll just show through or get worse.
- Prime it up: For tricky surfaces like bare brick or very smooth plaster, a coat of primer or a PVA solution is your best mate. It gives the plaster something to grip onto and stops the wall from sucking all the water out of the plaster too quickly, which can also cause it to fail.
Don’t skimp on prep work. It might seem like a faff, but it’s the foundation for a good plaster job. Rushing this bit is a surefire way to invite problems later on.
How To Avoid Uneven Plaster Layers?
Nobody wants a wall that looks like a relief map, right? Unevenness usually comes from not applying the plaster consistently or not smoothing it off properly.
- Mix it right: Make sure your plaster mix is the right consistency – not too stiff, not too runny. It should be like thick yoghurt. If it’s too dry, it’ll be hard to spread evenly; too wet, and it’ll just slide off.
- Work in manageable sections: Don’t try to plaster the whole wall at once. Tackle it in smaller bits. This way, you can focus on getting each section smooth before it starts to set.
- Use your tools properly: A good float or trowel is key. Keep it at a consistent angle and use smooth, even strokes. Don’t press too hard, but make sure you’re levelling it out as you go.
What Causes Plaster Cracking And How To Prevent It?
Cracks are the bane of a plasterer’s life. They can pop up for a few reasons, but often it’s down to movement or the plaster drying out too fast.
- Drying too quickly: If the plaster dries out too fast, especially in warm, dry, or windy conditions, it can shrink and crack. Try to keep the room at a moderate temperature and avoid direct sunlight or drafts on the wet plaster.
- Applying it too thick: Putting on a really thick layer, especially the final coat, can lead to cracking as it dries and shrinks. It’s better to build up thin layers, letting each one go off a bit before applying the next.
- Movement in the building: Sometimes, cracks appear because the building itself is settling or there’s some movement in the structure. If you’ve prepped and applied correctly and still get cracks, it might be worth looking into the underlying cause.
The key is patience. Don’t rush the drying process, and always follow the manufacturer’s instructions for your specific plaster mix. A bit of care and attention goes a long way to avoiding these common headaches.
Enhancing Plastering Efficiency FAQs
Right then, let’s talk about making your plastering job go a bit smoother and quicker. Nobody wants to be stuck on a plastering job for ages, do they? It’s all about being smart with your time and how you set things up.
How Can I Improve My Time Management When Plastering?
When you’re plastering, time management is key. It’s not just about rushing, but about working steadily and not wasting time. Think about it: you need to give each coat enough time to dry properly before you slap on the next one. A good rule of thumb is to leave at least 24 hours between coats, especially if it’s a bit damp. For bigger jobs, it might be worth breaking it down into smaller chunks over a few days. This way, you can be sure each bit is done right without feeling like you’re constantly under the gun. Balancing speed with accuracy is the real trick here. You want to get the plaster on, but you also want it to look good, so don’t cut corners on the finishing.
How To Organise My Workspace For Plastering?
Your workspace can make or break your plastering session. First off, have a good clear-out. Get rid of anything that’s not needed and make sure you can actually move around without tripping over stuff. You want your tools and plaster mix within easy reach. Think about arranging things so you’re not constantly walking back and forth. It saves a surprising amount of time and energy. Keep your most-used tools, like your trowels and hawk, in a tool belt or a caddy right next to you. It makes a massive difference when you’re in the zone. Also, try to set up your mixing station so it’s convenient for getting plaster onto your hawk without a fuss. A tidy space means a tidier job, and usually, a faster one too.
What Is The Best Way To Maintain Plastering Tools?
Looking after your tools is a big part of being efficient. If you’ve got dried plaster caked onto your trowels, it’s going to make your life miserable and your finish look rough. So, give them a good clean after every use. Seriously, it takes two minutes and saves you hassle later. Get rid of all that plaster gunk. Then, make sure you store them somewhere dry. Rust is the enemy of good tools. A dry shed or a toolbox is perfect. If your tools are in good nick, they’ll work better, and you’ll get a much nicer finish on your plaster. It’s worth the effort, trust me. Keeping your tools clean and dry means they’ll last longer and perform better, which is a win-win.
Proper tool maintenance isn’t just about making them last longer; it directly impacts the quality of your work and how quickly you can get the job done. Clean, sharp tools make plastering feel less like a chore and more like a craft.
Here’s a quick rundown on keeping your kit in shape:
- Trowels and Floats: Wash off all plaster immediately after use. A stiff brush can help get into the corners. Dry them thoroughly.
- Buckets: Rinse them out well. If you’re using different coloured plasters, make sure you don’t cross-contaminate.
- Mixing Paddles (for drills): Scrape off excess plaster and rinse. Dried plaster can make them unbalanced.
- Storage: Keep everything in a dry place. A dedicated toolbox or wall-mounted racks work well. This also helps you find what you need quickly, which ties back into efficiency.
Remember, well-maintained tools are your best friends on a plastering job. They make the work easier and the results better. For more on keeping things in good condition, you might find tips on tool care helpful.
Plaster Maintenance FAQs

Keeping your plastered walls and ceilings looking their best isn’t just about the initial finish; it’s about a bit of ongoing care. Think of it like looking after a nice piece of furniture – a little attention goes a long way.
How Often Should I Check My Plastered Surfaces?
It’s a good idea to give your plaster a once-over every six months or so. You’re not looking for anything major, just keeping an eye out for any little changes. This means checking for:
- Small cracks: These can sometimes appear, especially if there’s any movement in the building.
- Bubbles or peeling: This might suggest a problem with adhesion or moisture.
- Discolouration: This could be a sign of dampness.
Catching these things early means you can sort them out before they become a bigger headache. Regular, quick checks are your best friend for long-term plaster health.
What Are The Best Repair Techniques For Plaster?
For minor issues, like small hairline cracks, you can often get away with a bit of filler. Just smooth it over, let it dry, and then you can lightly sand it down and touch it up with paint. It’s pretty straightforward.
If you’ve got something a bit more serious, like a larger crack or a patch that’s come loose, you might need to do a bit more. This could involve carefully removing any loose plaster, filling the gap with a suitable plaster repair mix, and then smoothing it level with the surrounding surface. It takes a bit of patience to get it looking right, especially if you’re trying to match the existing texture.
For most common repairs, a bit of filler or a plaster repair compound will do the trick. The key is to get the surface clean and dry before you start, and to apply the repair material in thin layers, allowing each to dry before adding the next. Don’t rush it – that’s where mistakes happen.
When Should I Seek Professional Help For Plaster Repairs?
Honestly, if you’re looking at anything more than a small crack or a tiny chip, it’s probably time to call in someone who knows their stuff. This is especially true if:
- The damage looks like it might be related to water ingress or damp.
- There’s a large area of plaster that’s cracked, crumbling, or bulging.
- You’re dealing with a ceiling repair, which can be trickier and riskier.
- You’ve tried a small repair and it just doesn’t look right or keeps failing.
Professionals have the tools and the know-how to deal with more complex problems, and they can make sure the repair is strong and blends in properly. It might cost a bit more upfront, but it can save you a lot of hassle and potential future problems.
Professional Vs DIY Plastering FAQs
So, you’re thinking about tackling a plastering job yourself, or maybe you’re weighing up whether to call in the cavalry? It’s a common question, and honestly, there’s no single right answer. It really depends on a few things.
When Is It Best To Hire A Professional Plasterer?
Look, if you’ve got a massive job, like plastering a whole house, or if you’re dealing with tricky bits like old, uneven walls or intricate ceiling work, then getting a pro in is probably your best bet. They’ve got the experience to spot potential problems before they even start and know all the tricks to get a really smooth, professional finish. Plus, they can often get the job done a lot quicker than you could. It might seem like more money upfront, but if it means avoiding costly mistakes or having to redo the work, it can actually save you cash in the long run. For really complex jobs, like dealing with significant water damage or wanting something fancy like Venetian plaster, a professional plasterer is definitely the way to go. They have the right tools and know-how to handle these situations properly.
What Are Some Tips For DIY Plastering Projects?
If you’re set on going the DIY route, the biggest thing is to plan, plan, plan. Figure out exactly what you need – plaster, tools, sandpaper, the works – and how long you think it’ll take. Before you even open a bag of plaster, make sure your walls are spotless and ready. Gather all your tools first; you don’t want to be hunting for a trowel when you’ve got plaster going off. When you start applying, try doing smaller sections first. It’s better to put on a few thin coats than one thick one, and always give it a light sand between coats for that super smooth finish. Don’t be afraid to look up tutorials or ask a mate who’s done it before for advice. It’s all about taking your time and not rushing.
Is Plastering An Expensive Process?
This is where DIY really shines. If you’re doing it yourself, the cost is mainly for the materials and any tools you need to buy. For a small job, it can be pretty cheap. Hiring a professional, however, will naturally cost more because you’re paying for their time, skill, and experience. The price can vary a lot depending on the size of the area, the condition of the walls, and where you live. For instance, getting a quote for a whole house will be significantly different from just plastering a single wall. It’s always a good idea to get a few quotes from different plasterers to compare prices. Remember, though, that sometimes paying a bit more for a professional means you get a better result that lasts longer, which is a kind of saving in itself. Investing in quality plastering can contribute to healthier living spaces by sealing gaps and preventing issues like mold and dampness, making it a worthwhile expense for your home’s long-term well-being.
Thinking about plastering your place yourself or hiring a pro? Our “Professional Vs DIY Plastering FAQs” section breaks down the key differences to help you decide. We cover everything from cost and time to the final finish. If you’re still unsure, why not get a quote from the experts? Visit our website today to learn more and see how we can help you achieve a perfect plaster finish.
So, What’s The Takeaway?
Right then, we’ve gone through quite a bit about plastering, haven’t we? From figuring out what type to use and how to mix it up properly, to actually getting it on the wall and making it look smooth. It’s not rocket science, but it does take a bit of care and attention. Remember, prepping the surface is key – don’t skimp on that bit! And if you’re unsure about a big job, or maybe a really tricky bit, there’s absolutely no shame in calling in a pro. They’ve seen it all before and can save you a load of hassle. But for smaller bits and bobs, give it a go yourself. You might surprise yourself with what you can achieve. Happy plastering!
Common Plastering FAQs Answered by Experts
What are the main types of plaster I might come across?
You’ll usually find a few main types of plaster. There’s lime plaster, which is brilliant for older buildings because it lets walls ‘breathe’. Then you’ve got gypsum plaster, which dries pretty quickly and is great for most modern homes. Cement plaster is super tough and weather-resistant, making it a top choice for outside walls or areas that need to be really strong.
How do I get my plaster mix just right?
Getting the mix spot on is key! You need to be pretty precise with how much water and powder you use. It’s best to add the powder to the water gradually while mixing, ideally with a paddle or drill attachment. Keep going until it’s like a smooth, creamy paste with no lumps. Getting this consistency right means it’ll spread evenly without any nasty surprises.
What tools are absolutely essential for plastering?
For plastering, you can’t do without a few basics. You’ll definitely need trowels of different sizes for applying and smoothing the plaster. A hawk is super handy for holding plaster while you work, and a bucket for mixing is a must. A good mixer, either by hand or with a drill, will save you a lot of effort and make sure you don’t get lumps.
How should I prep my walls before I start plastering?
Before you even think about plastering, give your walls a good clean. Make sure they’re totally dry and free from any dust, dirt, or flaky bits. If there’s old paint or wallpaper, get rid of it. Any cracks or holes need filling too. A quick coat of primer, like a PVA solution, really helps the plaster stick better and stops it drying out too fast.
How long does plaster usually take to dry?
The drying time for plaster can vary quite a bit. Things like how warm it is, how much moisture is in the air, and how thick you’ve applied the plaster all play a part. A good rule of thumb is to tap it – if it sounds hollow, it’s likely dry. Painting or finishing too soon can cause problems later, so patience is a virtue here!
What are the biggest mistakes people make when plastering?
Loads of people mess up the surface prep, which means the plaster won’t stick properly. Another common one is mixing the plaster wrong, making it too wet or too dry. Applying it unevenly is also a biggie, leading to bumpy walls. And don’t forget to let each layer dry properly before adding the next – rushing this is a recipe for cracks!